Monday, April 27, 2009

Progress report

Lots of stuff going on around here in our Crapsman Bungledlow....The house has lifted almost 4 inches - in the picture below the top of the tape measure is where we started...We have about an inch and quarter to go - All sorts of things are shifting since the house has been sagging a long time and the prior work done on the house just worked around the leaning - The kitchen counter has moved up an inch, and the "replacement" support they put in the basement is floating and has shifted quite a bit. We are getting there!
As usual, I have multiple projects going, the first was a result of a fortuitous find and the local 99 cent store. They had some half round planters, which became the recipients of some herbs ( Thai basil and Mint) in the picture and three planters of strawberry plants on the stair rail. It has dressed up the back on the house and at the same time I have a nice supply of my favorite herbs. I bought more pots and will probably add more as time passes. Right now I am trying to root a lemongrass plant from a fresh one I bought at the market. I spent several weeks looking for a plant at all the local nursery's without any luck. A very nice employee at Armstrong Nursery gave the me instructions to root the one I bought - find one with a bit of root at the base, stick it in soil, cover it with plastic for a few days to capture the moisture, put it in bright light with no direct sun and it should root. So far it has been a week but i have not seen any progress...I had to take off the plastic because I was seeing a little mold forming... We shall see how this experiment goes. If anyone knows of a place in Southern California where I can find a lemongrass plant, let me know!
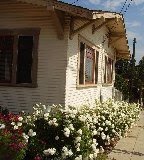
In other yard news, I finally bought my parkway trees this past weekend. This is no small feat seeing as I have been researching different trees that would be appropriate - grow fairly quickly, are deciduous, and have a shape I like. I thought about Ginkos (Slow growing, too large for the 4' space between the curb and sidewalk, and very pricey) California Sycamores ( Too big for the space) Crape Myrtles ( Beautiful, but the shape wasn't quite to my liking) and finally, Ornamental Plums. They have dark red leaves and are covered with a profusion of pink flowers in the early spring. Over the past week or so I have been pricing them and had decided that I was going to go ahead and buy one or two at a time, since the least expensive ones I had found were 19.99 at Home Depot. Well, as luck would have it, Steve and I were at Home Depot on Sunday pricing supplies for the bathroom renovation (I wanted to redo the kitchen first but he really hates the tub area) in any case, as we were leaving, I noticed they had a section FILLED with ornamental plums in 5 gallon containers with a sign - 9.99..... So needless to say I bought the six we need - 4 on the side of the house and two for the front, and I got two in the ground this evening. I always forget till I am swinging the pick ax just how bad the soil is here. However, I received the nicest feedback from the neighbors on their evening walks and was asked at least three times what kind of trees they were ( it happened in the home depot lot when we are loading them in the car). One fellow who lives in a stunning and immaculately kept house up the street told me how much he appreciates the work we have done on the house and how it has really made a difference. Its nice to know it does make a difference, and motivates me to do more...

Monday, April 13, 2009

Milestone

Well, I am now at the halfway point! 2.5 inches up and 2.5 inches to go - The bathroom door now actually closes, latches and locks... a first since we moved in. The bedroom doors are not there yet, but soon they to will close and latch...The next step is to start digging the footings for the permanent posts, which is not going to be much fun. I am planning to go down at least 16 inches to make sure they are very well anchored. With this project in progress, I am formulating the next project - replacing the hardwood floors in the dining room and hallway. I was fortunate to get my hands on 5000 square feet of vintage oak floors that matches what is already here. I replaced three quarters of the oak floors in the front room in Long Beach, and so I already own a floor nailer and have had lots of practice. Below is the picture of the floor prior to sanding. I mixed the existing floorboards with the "new" ones so I could keep as much of the original as possible. Here the floor is really shot so I suspect I won't be able to reuse much. I may use the original flooring to patch the damaged boards in the living room. When they installed new wiring, they ran steel conduit through the floor and bolted the outlets on top of the baseboards. One of the near future projects will be to redo all the outlets and move them into the wall. At the same time I will add a few more and relocate some of the oddly placed ones. The projects continue.

Tuesday, April 7, 2009

Progress at Last


Whew! It has been quite awhile since I have done any updates, and there is a number of things to report - most importantly, that the jacking of the house has begun! When we bought this place a year and half ago, one of its chief charms (along with the broken windows, see through bathroom floor and resident rat population, was a severe sag in the center of the house. We dealt with the other issues prior to moving in, the sag was sort of the elephant in the room.


Our weekly cocktail parties had an added element of surprise when you realized that the room was leaning - I always blame it on the drinks. In any case, we lived with the doors that would not close, and removed the rollers off all the dinning room furniture. So finally, I bought the floor jacks and some 4X4's, and strung up a masons line to see how far it had fallen. It turned out that it was over five inches, and to top it off ALL the posts minus one had completely rotted at the base, so we had a twenty foot span resting on one post - whose base was resting on sand. The main beam had sunk so low that the center floor joists were floating about 1.5 inches above the beam, so the floor had no support whatsoever. After researching all over the web and consulting with a number of contractors, I set four jacks on some precast concrete bases, and attached the 4x4 posts to the support beam using metal brackets. Then I started the jacking by screwing the jack one turn - which was 1/8". I have done one turn a day for the last two weeks and have lifted the house almost two inches. All the joists now are sitting on the beam, the bathroom door ALMOST closes, and the kitchen cabinets in the low corner of the kitchen have lifted 1/2 inch. So far so good and the plaster cracks have been minimal and limited to where it had already been patched before.

In addition to the excitement inside, I have made some progress to the outside - I put in a hedge and a nice lion fountain, and it looks great! Sure beats the rusty chain link and weeds...